
Maschine2LR User Manual
Maschine2LR turns a Native Instruments Maschine Mk3 into a control surface for Lightroom Classic. The eight knobs drive Develop sliders, the two screens show live values and the current photo, buttons and pads trigger actions, and the mapping follows whatever module and tool Lightroom is in.
Three pieces work together:
- USB drivers: Windows has to let the program talk to the hardware directly.
- The Lightroom plugin: a small plugin that exposes Lightroom.
- The program: it connects the two and lives in the tray.
The program comes as a plain folder, no installer, and it puts the plugin in place for you. Only the driver step needs your hands, once per machine.
Everything in this manual is about the built program on Windows. Running from a source checkout is covered in Appendix A.
1. Getting started
1.1 Install
- Do the USB driver swap in 1.2. Windows needs Zadig and a click from you, once per machine.
- Download Maschine2LR-\<version>.zip from
maschine2lr.svenbluege.de
and unpack it wherever you like, for example a folder in your user
profile. It's one folder,
Maschine2LR, withMaschine2LR.exeinside. Windows may ask once whether to run a program it doesn't know (More info → Run anyway). - Start Maschine2LR.exe. It appears in the tray. On this first start
it copies the Lightroom plugin to where Lightroom Classic loads it by
itself (
%APPDATA%\Adobe\Lightroom\Modules\Maschine.lrplugin) and shows a notification saying so. - Start Lightroom Classic. File → Plug-in Manager should list Maschine Controller with a green status. There's nothing to add there. (If Lightroom had the plugin disabled at some point, it remembers that. Maschine2LR clears the flag while Lightroom is closed and tells you; if Lightroom was running, close it and start Maschine2LR once more, or tick Enable in the Plug-in Manager.)
- See 1.3 for what the tray offers. To have the program
start with Windows, put a shortcut to
Maschine2LR.exeinto the Startup folder (Win+R,shell:startup).
Your own files live in %APPDATA%\maschine2lr: config.yaml, the
profiles\ folder the editor works on, and maschine2lr.log, which is the
place to look when something is off. An update never touches them.
If you had added the plugin through the Plug-in Manager from a source checkout before, remove that entry. Lightroom must not see two copies.
1.2 USB drivers (one-time)
The Maschine's screens and control surface aren't reachable through MIDI, so the program talks to the raw USB interfaces. Windows won't allow that until those interfaces use the WinUSB driver.
Close the Native Instruments software first. NI's background services
hold the hardware open, and nothing else can claim it while they run. In
Task Manager (Ctrl+Shift+Esc), end these if present:
NIHardwareAgent.exeNIHostIntegrationAgent.exe
Also close Maschine 2, Komplete Kontrol and Controller Editor.
This is a real trade-off. With WinUSB on these interfaces, the official NI software can no longer use the device as a Maschine. To go back, see Reverting the drivers.
Replace the driver on two interfaces:
- Download and run Zadig.
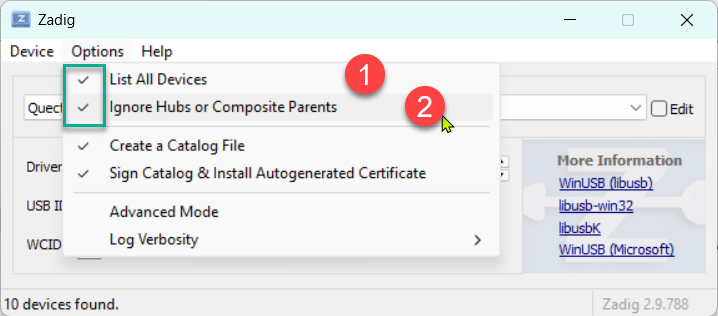
- Enable Options → List All Devices.
- Enable Options → Ignore Hubs or Composite Parents. Without this you only see the parent device, not the individual interfaces.
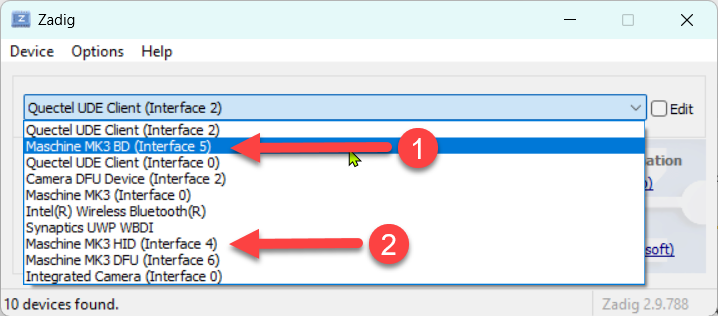
- In the dropdown, pick the two Maschine entries, one after the other: Maschine MK3 HID (Interface 4), the buttons, pads, encoders and LEDs, and Maschine MK3 BD (Interface 5), the two displays.
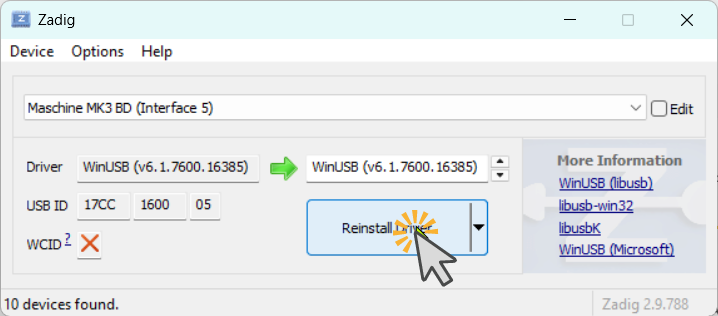
- With an interface selected, check that the driver on the right reads WinUSB, then click the big button: Install Driver, or Replace Driver / Reinstall Driver if something is there already. Do this for both interfaces.
Leave every other interface alone. Interfaces 0 to 3 are the USB audio and MIDI functions, and interface 6 is the firmware-update (DFU) interface, the one part of this device where a mistake could plausibly brick it.
Verify: start Maschine2LR. The first line of its tray menu reads Maschine Mk3 connected when the swap took effect. If it says the Maschine is plugged in but its USB interfaces cannot be opened, the swap didn't take: check that NI's agents are closed, replug the USB cable, and redo the two interfaces.
1.3 First start
For the first twenty seconds a small window shows what's going on: the
version, what the program is doing (the bar moves while it starts and
fills once the program has found, or failed to find, the Maschine),
whether the Lightroom plugin is in place, and the links to the website,
the donation page and the author.
Click it to close it early; splash.show: false in config.yaml turns it
off for good. After that, Maschine2LR lives in the tray, and only one
copy runs at a time: start it again and it just points you to the icon
and opens the editor. Its menu, from the top:
- The status line: Maschine Mk3 connected, or what's in the way (not plugged in, held by NI's software, driver not swapped).
- The Lightroom line: Lightroom connected (plugin v…) or Waiting for Lightroom.
- Open profile editor (also a double-click on the icon) opens the
mapping editor in your browser at
http://127.0.0.1:8765. - Open profiles folder shows the folder your profiles live in
(
%APPDATA%\maschine2lr\profiles), for a backup or to drop in a profile file from somewhere else. The editor and a running program notice new files by themselves. - Add missing shipped profiles copies over the profiles that come with the program and that you don't have yet. Restore shipped profiles… puts the shipped set back over your copies, after asking and after a backup. See 1.5.
- Save diagnostics report and Open log: see Troubleshooting.
- The Lightroom plugin line shows which version is installed and which one the program ships. The program keeps the two in step at every start; Install Lightroom plugin does the same copy by hand, for when Lightroom's Modules folder was cleaned out.
- Stop Native Instruments software / Start Native Instruments
software again: NI's background agents hold the controller when it
still has the stock driver; with the WinUSB driver from section 1 they
hold nothing, and the program does not ask about them. Only when the
Maschine is plugged in and cannot be opened while they run does it ask
whether to stop them - and starts them again when you quit, so the
Maschine software works as before afterwards.
config.yamlcan make that automatic (ni_software.on_start: stop) or forbid it (leave). - The version line: Version … - up to date, or Update to …, and Check for updates now under it. See 1.5.
- maschine2lr.svenbluege.de opens the website.
- Quit.
The program doesn't mind the order things start in. It waits for the Maschine, picks it up when plugged in, and carries on when Lightroom restarts. While Lightroom is closed the screens show Waiting for Lightroom; once it's back with the plugin loaded (a couple of seconds), the values reappear.
1.4 Try it
In Lightroom, open a photo in Develop. With the profiles that come with the program:
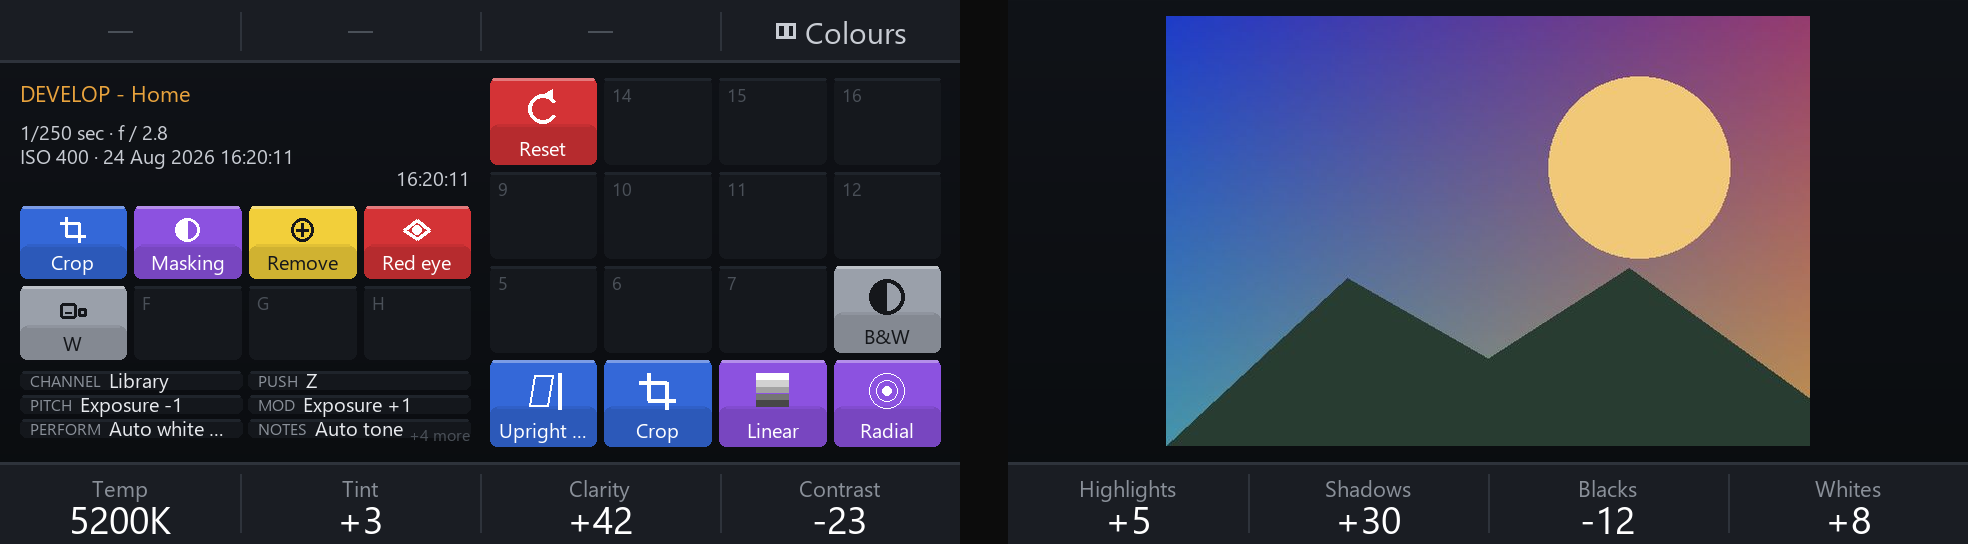
- Knobs 1 to 8 edit Temperature, Tint, Clarity, Contrast, Highlights, Shadows, Blacks and Whites. Their names and live values run along the bottom of the screens, one under each knob. A quick tap on a knob resets its parameter.
- Touch strip nudges Exposure. Slide a finger to move it; the LEDs show the value in white and your finger in red.
- Main dial steps to the next or previous photo, on this page and in Library.
- Group A opens the Crop tool. The knobs then become straighten and perspective controls, the pads offer 4:3, 16:9, 16:10 and the original ratio, and the screens relabel themselves. Knob 8 sizes the crop, a quarter percent per detent. The main dial does the same in one-percent clicks, a tilt moves the crop (hold the tilt and it keeps moving), and its ring lights blue. Pad 1 goes back.
- Group B opens the Masking tool: pads 1 to 4 start a new mask (linear, radial, luminance range, AI subject), the arrow buttons step through the masks, Erase deletes the selected one, and the knobs edit the selected mask. Pad 16 goes back.
- Lightroom's own eyedroppers and guides - the White Balance Selector on W, Point Color in the Color Mixer, the same tool inside a mask, Guided Upright and the depth-refinement brush - are picked up in Lightroom's panels, not from the controller. Each has a page of its own so you are never stuck in one: Group E and pad 1 (Done) put the tool down, and pad 4 types Esc into Lightroom. Under the white balance eyedropper the knobs still trim Temperature and Tint and pad 8 is Lightroom's automatic white balance, so you can click a neutral spot and correct it without putting the tool down. Point Color inside a mask hands you back to the Masking tool with the mask still selected.
- Channel switches to the Library module; there, Channel brings you back to Develop, pads 1 to 5 set stars, pads 9 to 11 pick, reject and unflag, and Group A / B step through the photos.
- Mute is undo.
- Display button 4 (Colours) opens the colour pages: hue, saturation, luminance and black & white mix, one colour per knob. The eight buttons above the screens then switch between Basic, Hue, Sat, Lum and B&W, toggle the photo between colour and black & white, and undo / redo.
That automatic remapping is the point of the whole thing: the mapping follows Lightroom's module and tool. Everything above is just the mapping that ships; the editor changes all of it.
1.5 Updating
Shortly after it starts, and then once a day, Maschine2LR asks GitHub
whether a newer release exists. That's one anonymous request; nothing
about your machine is sent. updates.check: false in config.yaml
switches it off. When there is a newer release, a notification says so
once, and the version line in the tray menu reads Update to Maschine2LR
\<version>… until you update. Nothing is downloaded or changed until
you click that line - or the notification itself - and answer Yes.
Check for updates now, under the version line, asks GitHub right away
and answers either way - up to date, an update, or that GitHub could
not be reached - so you need not wait for the daily check or restart the
program; it works with the daily check switched off too.
Updating from the tray. Click the notification, or the line in the
tray menu, and confirm. The program
downloads the release's zip, checks it against the checksum GitHub keeps
for it, and unpacks it into a folder next to the program folder
(Maschine2LR.new). The menu line shows the progress. Then the program
quits, a small script waits for it to end, swaps the folders, starts the
new version and removes the old folder. The whole thing takes a moment;
the new version announces itself with a notification. Nothing of yours
is touched: your profiles and settings live in %APPDATA%\maschine2lr.
The plugin is part of every release, and the new program updates
Lightroom's copy on that start and shows a notification. Restart
Lightroom Classic to load it. The tray's Lightroom line shows the
plugin's version once it has connected, and it should match the
program's. (A plugin that is newer than the program's is left alone.)
This needs the program folder to sit somewhere you can write, which is
the case for any folder in your profile, on the desktop, or on a data
drive. Under C:\Program Files it is not, and the program tells you so
and offers the download page instead of trying. The same happens when
the download fails or the file does not check out. The script's own log
is %TEMP%\maschine2lr-update.log, in case something looks wrong.
Updating by hand (what the tray does, done yourself):
- Quit Maschine2LR from the tray menu and close Lightroom Classic.
- Download the new zip and unpack it over the old folder, replacing everything there, or into a new folder and delete the old one. The folder holds nothing of yours.
- Start
Maschine2LR.exe. The plugin is updated on this start as above.
Removing it. The plugin sits in Lightroom's Modules folder, and
Lightroom only offers Disable for plugins there, not Remove (that
button is for plugins added by path). To take it out for good: quit
Maschine2LR, close Lightroom, delete
%APPDATA%\Adobe\Lightroom\Modules\Maschine.lrplugin, and delete the
program folder. Your profiles in %APPDATA%\maschine2lr stay until you
delete them too.
Your settings and profiles live in %APPDATA%\maschine2lr, not in the
program folder, so an update never touches them. The flip side is that
profiles that come with a new release do not reach an existing
installation by themselves, because the whole shipped set is copied only
the first time the program runs. After an update, Add missing shipped profiles in the tray
menu brings over the ones you don't have, by file name, and leaves every
profile of yours alone, including one with the same name as a shipped
profile, whatever you did to it. To start over with the shipped set,
Restore shipped profiles… writes every shipped profile over your copy
of the same name, after asking you and after copying your whole folder to
profiles.backup-<date> next to it. Profiles you made under other names
stay. The editor picks up the new files at once.
2. Everyday use
2.1 What the screens show
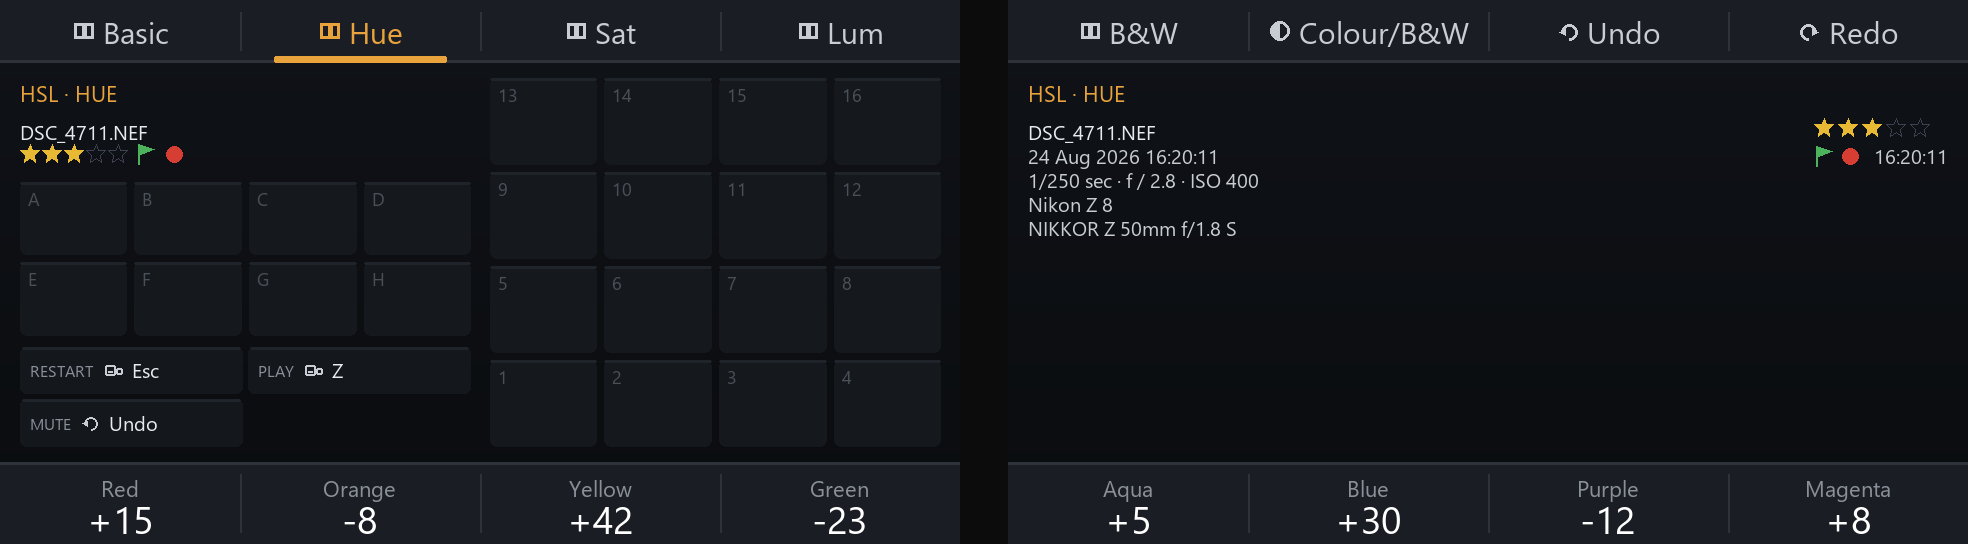
Each screen can show the photo, the button map, the list of masks, or just the photo's details. Each has a title, a chosen set of metadata lines, and a corner for rating, flag, colour label and a clock. Along the bottom, four slots (one under each knob) show the name and live value of what that knob edits.
Two things need no configuring, since they follow from the bindings. A bar along the top of each screen captions the four buttons directly above it, and switches to the Shift layer while Shift is held, as the lights do. Beneath the details, a screen set to the button map draws the Group buttons and the pads as miniature grids in their real arrangement, each bound one filled in the colour its LED shows, with a word for what it does. You find a control by shape and colour first and read second.
2.2 Shift, taps, pages
- Shift layer: hold Shift and every control switches to its second binding - buttons, pads, the knobs, the touch strip and the dial - lights and screens included, and switches back on release. A control with no Shift binding keeps doing its plain one, so holding Shift never makes anything go dead. The Shift key is lit whenever the profile has a Shift layer, and bright while the layer is live. Whether Shift has to be held or is pressed to switch the layer on and off is a setting (The Shift key under the editor's Settings): holding it works because the knobs keep reporting while it is down, so a shifted knob is turned with the other hand; pressing to switch suits one-handed work.
- Knob taps: a brief touch on a knob without turning it fires its On tap action. Resetting that knob's own parameter is the obvious one.
- Pages: a module or tool can have several profiles, and buttons bound to Next page, Previous page or Go to page move between them. The page you were on is remembered per module and tool, so leaving Develop and coming back finds the same page.
- Stateful buttons: a button bound to Upright or Black & white shows its colour while that state is on and plain white while it's off, and its caption on the screen reads … on / … off. So one Toggle button always says what the next press will do.
2.3 Encoders and the touch strip
A knob detent moves its parameter by a step set in the profile. For Temperature and Tint the shipped Basic page asks for a fraction of the parameter's range instead of a fixed number, and when that range is a wide one like a raw file's 2000 to 50000 K, a detent moves it by a fixed ratio rather than a fixed number of kelvin. A step then feels the same warm or cool. On a JPEG (−100 to 100) it stays linear. Nothing to configure.
The touch strip has three modes, set per profile:
- Absolute: where you touch is the value, over the parameter's range or the part of it you chose. The LEDs show the level.
- Relative: sliding moves the value from where it is; a new touch never jumps it. Two colours: one for the value, one under the finger.
- Scrub photos: slide through the filmstrip.
2.4 Lightroom and NI's software
Nothing needs restarting on either side. Close Lightroom and the screens show Waiting for Lightroom; open it again and the values return. Unplug the Maschine and the program waits and picks it up again.
NI's agents come back with every sign-in and after NI updates. With the WinUSB driver in place that changes nothing; if they do hold the controller, the program asks whether to stop them the moment it finds the Maschine held, and Stop Native Instruments software in the tray menu does the same at any time. The agents are started again when you quit Maschine2LR.
3. The profile editor
Open profile editor in the tray menu (or a double-click on the icon)
opens http://127.0.0.1:8765 in your browser. Nothing else needs to be
running, neither Lightroom nor the controller. The editor makes no request
to the internet (no fonts, no scripts) and works with the connection off.
3.1 Profiles and where they apply
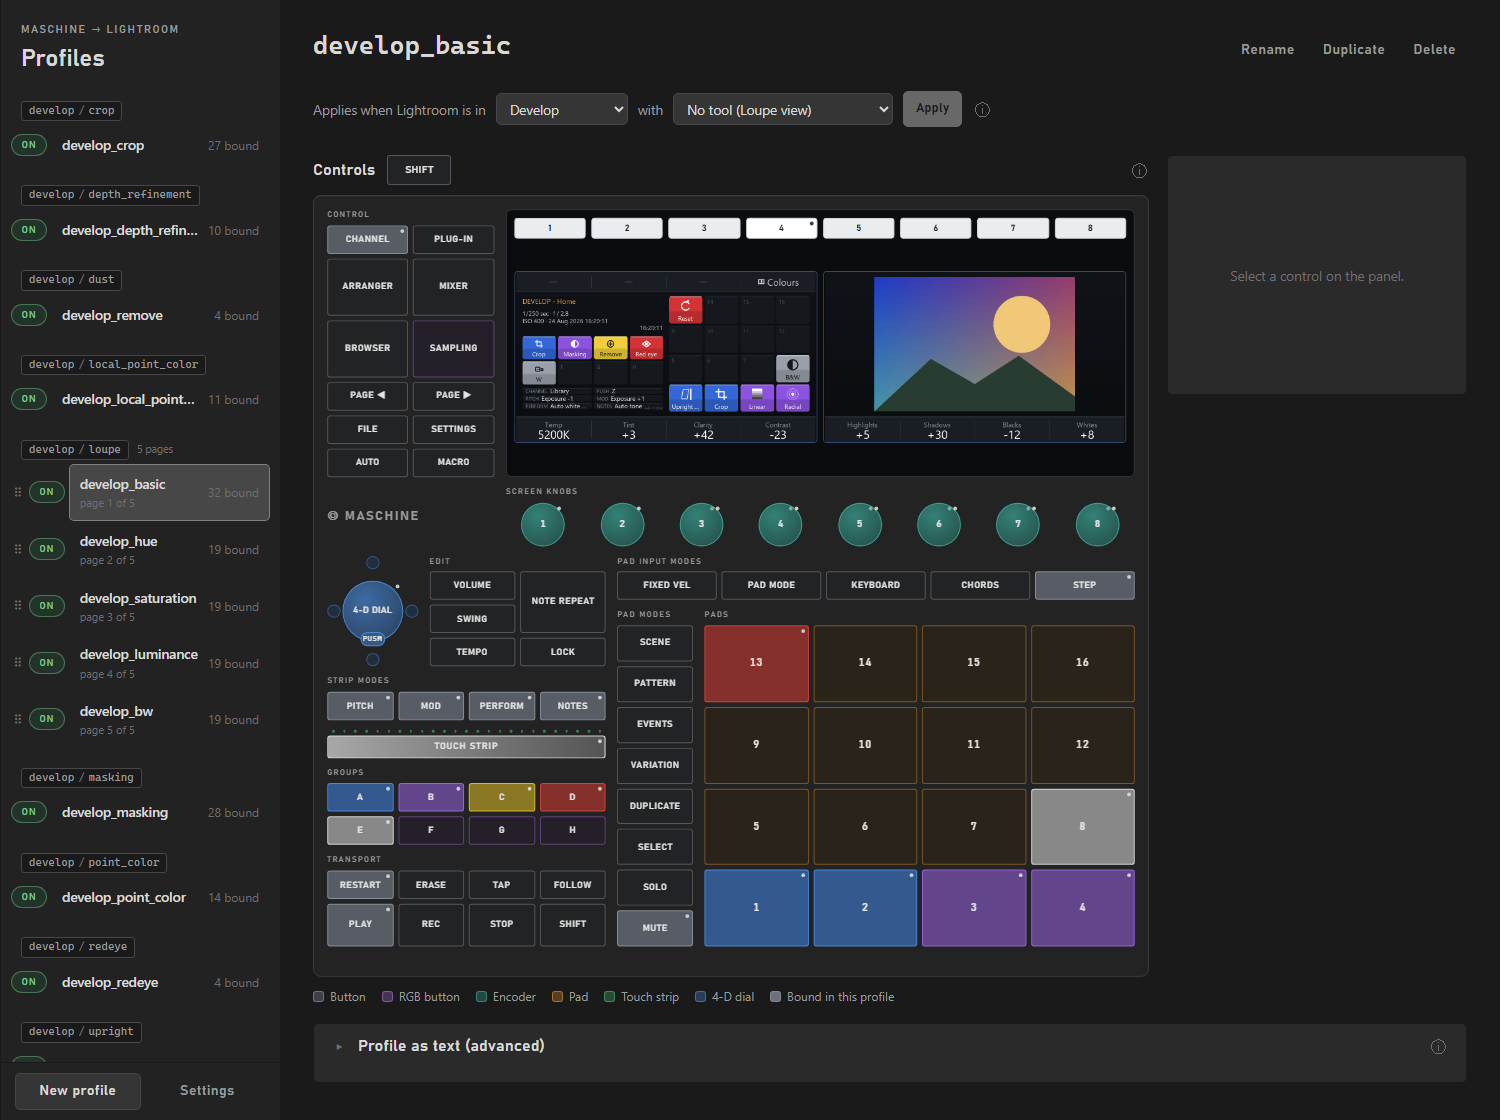
A profile is one mapping for one Lightroom context: Develop / Crop, Library, or the default that applies when nothing more specific does. The list on the left groups them by context. Each profile's match offers only combinations Lightroom can be in (tools exist only in Develop, so the tool box is disabled elsewhere). The most specific match wins, falling back to a module-only profile and finally to the default.
Pages. Two profiles with the same module and tool are pages of that match, say a basic Develop page and an HSL page whose knobs adjust one colour each. The list shows them under one heading in page order; drag a page by its grip (⠿), or use the arrow keys on the grip, to change the order. The first one shows first. A button bound to Next page / Previous page cycles through them, and Go to page jumps to one by name. That also works for a page of another module or tool: Maschine2LR then switches Lightroom there (module, then tool) and the page appears as soon as Lightroom reports the change. The list shows page 2 of 3 beside such profiles.
Disabling a profile. The ON/OFF switch beside each profile takes it out of the running without deleting it. A disabled profile is never selected, so another one, or the default, applies instead. The preview still shows a disabled profile as it would look if it were active.
Profiles are YAML files in %APPDATA%\maschine2lr\profiles\. A running
Maschine2LR notices a saved profile within half a second and switches to
it. If a file has a mistake, the program says so in its log and keeps
using the previous mapping, so a typo never leaves the controller dead.
3.2 Binding a control
Click any button, pad, knob, the strip or the dial on the drawn controller to see what it does in this profile and change it. Filled controls are bound; a second, fainter dot means a Shift-layer binding exists too. What you can choose comes from the plugin, so nothing on offer is a dead end. Long lists filter as you type.
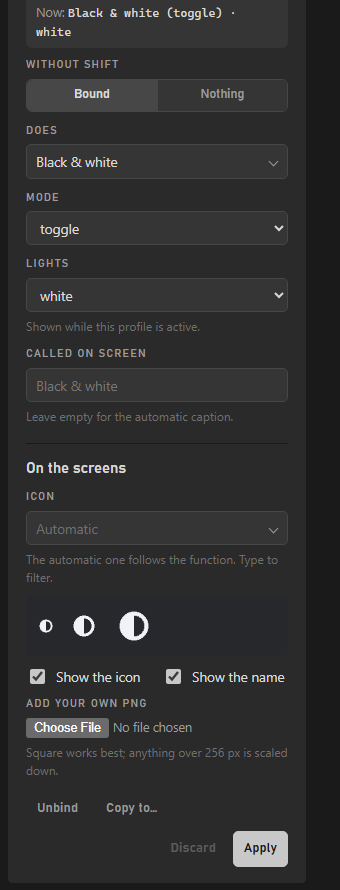
- Without Shift / With Shift: the two tabs at the top of a control's
form are its two layers. With Shift gives a control a second binding:
an action and colour on a button or pad, a second parameter on a knob
(Temperature without Shift, Clarity with), a second parameter or scrub
on the strip, a second job for the dial. Under each tab, what the
control does on that layer: Bound (the form below), Nothing (dark,
does nothing), and on the Shift tab As without Shift (nothing set: it
keeps doing what it does without Shift). Nothing on the Shift tab is
how a knob goes dark with Shift without being given something else to
do; in the file it is
none. The tabs say which layer you are editing; they do not change what the drawing shows. For that, press Shift - the key beside the Controls heading, or the one on the drawn controller, they are the same switch: the drawing and the screens then show what the unit shows with Shift held. - Called on screen: every binding can carry its own caption for the screens, Reset Temp instead of the automatic Reset Temperature. The field's placeholder shows what would be used otherwise.
- Icons: every function has a default icon (crop corners for the crop
tool, a star with a 3 for a 3-star rating, concentric rings for a radial
mask), drawn as shapes so they scale to any button. Per binding, choose
Show the icon, Show the name or both; pick a different icon from the
palette (type to filter); or add your own PNG, which is kept next to your
profiles under
icons\. - Drag a binding from one control to another of the same kind (knob to knob; pad or Group button to pad or Group button; plain button to plain button). It moves there, or swaps with what that control had - on the layer the drawing shows: with Shift off, what the control does without Shift moves and its Shift binding stays where it is; with Shift on, only the Shift binding moves.
- Copy to… gives the same control the same binding in other profiles - an Undo key that should be Undo wherever you are, set up once. The dialog lists every other profile with what it has on that control now: free, already the same, or what the copy would replace, so the one profile where that key means something else is visible before you confirm. Pick as many as you like (Select all takes the lot) and press Copy. The copy is a replacement, on one layer: the one the form's tab is on. On the Without Shift tab the control ends up doing in those profiles exactly what it does here without Shift, and what they do with Shift is not touched; on the With Shift tab it is the other way round. Apply your changes first; what travels is what is saved.
3.3 What a control can do
Parameters. A knob or the strip edits any Develop slider Lightroom
exposes: Basic, Tone Curve points, HSL, Colour Grading, Detail, Lens
Corrections, Effects, Crop and the black & white mix. While a mask is
selected in Lightroom, its own sliders are the parameters named local_…
(local_Exposure, local_Clarity, …), listed under Mask. Bind a knob to
one of those and it edits the mask, not the photo.
Buttons that step a value. Adjust parameter by moves a parameter by a
fixed amount (Exposure by +1, one stop), clamped to its range; Set
parameter to puts it at a value; Reset parameter puts it back to its
default. All three work for mask sliders too.
Navigation and view. Next / previous / first / last photo, switch module, select tool, grid view, toggle loupe, zoom in / out (also "a little"), zoom 1:1, toggle zoom, undo, redo, next / previous / go to page.
Selection. Select all, none, the inverse; deselect the active photo or all others.
Rating and flags. Set a rating (0 to 5) or step it up and down, pick, reject, clear the flag, set or clear the colour label.
Presets. Apply preset takes the preset from a list of what Lightroom reported the last time Maschine2LR was connected to it, so run it with Lightroom once before configuring. Applying a preset is one history step, so Undo takes it back. Adaptive (AI) presets cannot be applied this way. Lightroom's SDK copies a preset's settings, and an adaptive preset's masks are computed only when Lightroom's own preset panel applies it. They are left out of the editor's list.
Masks. New mask, Add to current mask and Subtract from current mask take a mask type: Brush, Linear gradient, Radial gradient, a Range mask by colour, luminance or depth, or an AI selection of the subject, sky, background, objects, people or landscape. Select next mask / Select previous mask step through the photo's masks, Delete selected mask and Invert selected mask act on the selected one, and Remove all masks clears them.
Geometry. Upright sets Lightroom's perspective correction mode (Off,
Auto, Full, Level, Vertical, Guided, or Toggle, which switches one
button between Off and Auto). Crop to aspect ratio fits the largest crop
of that ratio inside the current one. Pick original, 1:1, 16:9, 16:10 or
4:3 in the editor; in the file, any WxH works, long side first, so 16:9
is wide on a landscape photo and tall on a portrait one. Toggle
landscape / portrait crop turns the crop you have from portrait to
landscape or back, keeping its size where that fits (Lightroom's X key).
Toggle crop overlay steps to the next guide overlay drawn over the crop
(thirds, golden ratio, grid...) - Lightroom's O key, and that is
literally what it does: Lightroom's SDK has no call for the overlay, so
Maschine2LR brings Lightroom's window to the front and types the key. It
switches to the Crop tool first, since the key means nothing elsewhere.
Windows only.
Keyboard. Send keys to Lightroom types a macro of keys into Lightroom's window - the way to reach anything Lightroom keeps behind a keyboard shortcut and its SDK does not offer.
Lightroom shortcuts… is the list of them, so you do not have to know that exporting is Ctrl+Shift+E. Search by what you want (export, crop, before) or by the keys themselves, narrow it to one module, and pick a row: its keys become the macro, and you can edit them afterwards like any other. Arrow keys move through the hits and Enter takes the highlighted one. The list is Adobe's published reference for Lightroom Classic, the Windows keys, with the mouse-only entries left out and the older tool names kept in the notes - Lightroom renamed the Adjustment Brush and Spot Removal without changing K and Q.
In the editor the macro is a list: add keys from the list (letters, digits, function keys, Escape,
Enter, arrows, punctuation...), tick Ctrl, Alt or Shift on a key, drag
the rows into order, and add a Pause row where Lightroom needs a
moment between two keys. The same key may appear twice - Escape twice
closes a panel and leaves the tool. In the file it is one line, keys
separated by spaces and modifiers joined with +: arg: "ctrl+shift+e",
arg: "escape escape", arg: "] pause:300 [". A knob or the dial can
fire a macro per detent too (One action per detent, then Send keys
to Lightroom… for each direction). Maschine2LR brings Lightroom's
window to the front before typing, so the keys never land elsewhere;
what has the keyboard focus inside Lightroom still matters - a text
field would take the keys. Punctuation goes through your keyboard
layout, so ] is the ] key of a German keyboard too. Windows only. Move crop shifts
the crop a step up, down, left or right as you see the photo, stopping at
the edge; Resize crop makes it a step larger or smaller about its centre,
keeping its ratio. Both keep going while their button is held. A knob or
the main dial can fire them one action per detent, the same setting for
both; the step can ride in the argument (+0.25 for a quarter percent,
right=0.005 for a move), which is how a knob's thousand fine detents a
turn and the dial's few dozen clicks work the same crop at different
precision. Reset crop and Reset transforms do what they say.
Tone and colour. Auto tone is Lightroom's Auto in the Basic panel; Auto white balance likewise. Black & white switches the photo's treatment: Toggle on one button, or On / Off on two. It does what the panel's switch does: the profile becomes Adobe Monochrome, and switching back restores the colour profile the photo had (Adobe Color if the program never saw it). Reset all adjustments returns the photo to its defaults.
3.4 The screens
Click either screen on the drawn controller to set it up:
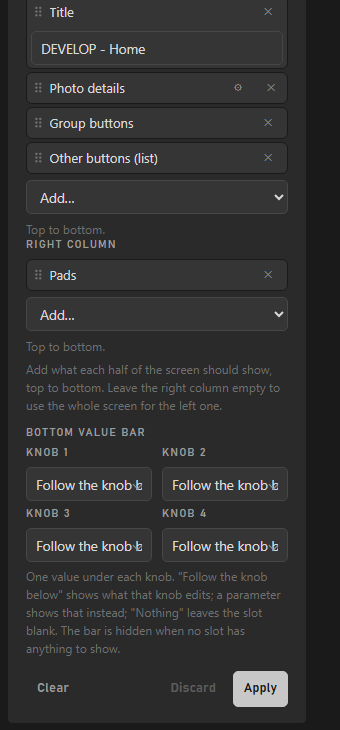
- Main area: two columns, each a stack of blocks: Title, Group buttons, Other buttons (list), Pads, Photo details, Photo, Masks. Drag a row by its grip (⠿) to reorder it, or Tab to the grip, press Space, move it with the arrow keys and press Space again. Leave the right column empty and the left one takes the whole screen, which is how a photo or a long list gets all the room. Groups are always drawn 4 wide and 2 tall and pads 4×4, the way they sit on the hardware, so your eye finds your hand; pads alone in a column fill it. A mapped tile shows its colour, icon and caption; an empty one keeps a faint label so the grid keeps its shape. A profile written before there were columns still works: Photo became a photo across both columns, Button map became details, Groups and the list on the left with the pads on the right, Masks a masks list.
- Photo details: appears under a column that has a Photo details
block, and each block has its own list, so the two columns of one
screen can show different things. Pick the details in order; add new
line where the next detail should start a line (say shutter speed and
aperture on one, ISO and exposure bias on the next). Without any new
line, short details share a line by themselves and long ones (file
name, date, camera, lens) stand alone. In the file:
{metadata:
  [shutter_speed, aperture, "|", iso]}
. - Corner badges: rating (stars), flag, colour label and a clock with seconds, each a checkbox per block. In a block that spans the screen they sit at the top right, in the arrangement of the older layout; in a narrow block, under the lines. A screen showing the clock is redrawn once a second, which the controller handles fine.
- Title: the Title block draws the screen's title in amber wherever you put it; the text field shows while a Title block exists.
- Bottom value bar: four slots, one under each knob. By default a slot follows the knob beneath it (name and live value), so a screen labels its knobs without listing the parameters twice. A slot can instead show any parameter by name, or nothing. The bar disappears when no slot has anything to show.
The Masks block. While the Masking tool is open it lists the photo's masks with the selected one on an amber bar, so you can see which mask the mask sliders and the mask buttons act on. More masks than fit: the list shows a window around the selected one, with the position (4 / 7) and how many lie above and below.
The Other buttons list. One line per bound button that is neither a pad nor a Group button: the button's name, the icon, what it does. One under the other while they fit; when the rows would get thin, the block takes another column instead - as many as its width allows, up to four across a block that spans the screen and two in a half-width one, since a narrower column has no room for a name and a caption. Nothing is left out until even that is full, and then it says how many more there are.
Discard. Beside Apply: it puts the settings back the way they are saved, and comes alive only while there is something to put back. It is the same answer as the Discard in the question you get when you leave an edited control, within reach without leaving. Nothing on disk changes either way - what it undoes is the form, and a screen being previewed goes back to its saved picture with it.
Seeing it before you apply it. While you change a screen's blocks, title, details or value bar, the screen above redraws itself with what the form says - the same renderer the panel gets, from a copy of the profile that is never written. The tile is marked not applied while what it shows is ahead of the file; leaving the form without applying puts the saved picture back.
The page you are on. A button in the top bar that switches to the page currently showing is drawn with an amber bar under it, like the button above it lit.
The screens are drawn at twice their size and scaled down for the hardware, which is why the tiles and the small text come out clean; the editor, the manual and the website show that larger picture as it is.
The screens in the editor are real previews. The two screens of the drawn controller show what the panel will draw with the selected profile active, rendered by the same code from a sample photo, sample metadata and a value for every cell, and they refresh after every save. Shift - beside the Controls heading, or the key on the drawn controller - switches them to the Shift layer, along with everything else on the panel.
3.5 The touch strip
Choose the mode (2.3). For Absolute and Relative, pick the parameter, the colour of the level and, in Relative mode, the colour under the finger. From / To limit the strip to part of the parameter's range; left empty, the strip covers the range Lightroom reports for the parameter. Scrub photos has no parameter: set how much of the strip is one photo, and the colour under the finger.
3.6 Controller brightness
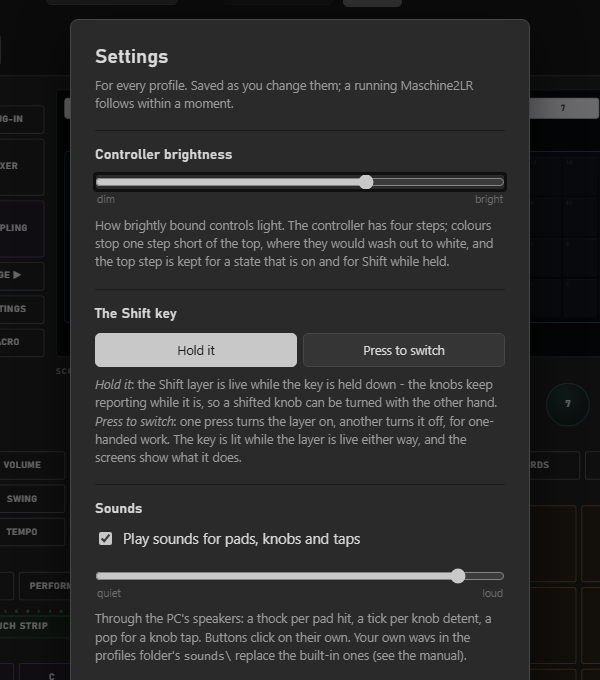
Settings at the bottom of the profile list sets how brightly every bound
control lights, in the controller's four steps (dim, low, normal, bright).
The top step is kept for a state that is on and for Shift while held, and
colours stop one step short, since the controller washes them towards
white at the top. It's a global setting (leds.brightness in
config.yaml), and a running Maschine2LR follows it within a moment.
3.7 Sounds
The pads and knobs have no feel of their own, so the program can give them one through the PC's speakers: a thock for a pad hit (louder the harder you hit, a little higher on the upper rows), a soft tick every detent's worth of a knob turn (a duller one when the parameter is at the end of its range), a pop for a knob tap, and, off unless you want it, a faint tick per LED step on the touch strip. Buttons click on their own and stay silent.
A pad counts one hit at a time: after a hit it ignores the same pad for about a fifth of a second, so the pressure bounce of one strike doesn't rate a photo twice. Drum on one pad faster than that and the extra hits (and their thocks) are dropped; two different pads in turn are fine.
Settings has the switch and the volume (sounds: in config.yaml has
the finer switches for pads, knobs, taps and the strip). Sounds go to
Windows' default output device. To use your own, put pad.wav,
knob.wav, stop.wav, tap.wav or strip.wav into a sounds\ folder
next to your profiles (%APPDATA%\maschine2lr\profiles\sounds\); short
mono or stereo wavs work best, and they're read at the next start.
3.8 By hand
The editor writes ordinary YAML, and your comments in the files survive editing, because it rewrites only what you changed. Profile as text (advanced) at the bottom of the editor page shows the file itself; it starts folded, and the editor remembers whether you left it open. It applies the same checks the program does, so an invalid file is refused before it is written rather than rejected after. A profile looks like this:
match:                       # which Lightroom context this applies to
  module: develop
  tool: loupe
order: 1                     # page order among profiles with the same match

encoders:                    # eight entries, left to right
  - {param: Temperature, span_fraction: 0.0005, tap: reset_param, tap_arg: Temperature}
  - {param: Exposure, scale: 0.002}
  - null                     # leave an encoder unbound

touch_strip:
  param: Clarity
  mode: absolute             # "relative" nudges instead; "scrub" walks the
  min: -100                  # filmstrip (no param: `step: 0.08` = one photo
  max: 100                   # per 8% of the strip). Leave min/max out to
                             # use the range Lightroom reports for the
                             # parameter; set them to cover part of it.
  colour: turquoise          # the value's level
  touch_colour: white        # relative/scrub: the LED under the finger

master_encoder:              # the big dial, one action per detent
  clockwise: next_photo
  counter_clockwise: prev_photo

shift_encoders:              # the knobs with Shift held; a missing or null
  - {param: Clarity, scale: 0.08}   # entry keeps the plain binding, and
  - none                     # `none` makes the knob dark instead
                             # (shift_touch_strip and shift_master_encoder
                             # do the same for the strip and the dial)

buttons:
  group_a: {action: select_tool, arg: crop, colour: blue}
  shift+group_a: {action: switch_module, arg: library}
  shift+group_b: none        # dark with Shift held
  pad_1: {action: set_rating, arg: "1"}
scale vs span_fraction. This matters more than it looks. scale
is a step in the parameter's own units. That's fine for Exposure, whose
range is always −5 to +5, but wrong for Temperature: on a raw file it's
measured in kelvin (roughly 2000 to 50000) and on a JPEG it's −100 to 100.
A step of 25 is a gentle nudge in one case and a third of the whole range
in the other. span_fraction asks for a fraction of whatever range
Lightroom currently reports, so one profile behaves well on both.
Value-bar slots: cells: [knob, Temperature, none, knob] under a screen;
leave cells out for "follow the knobs". A crop ratio is written 16x9,
never 16:9 (YAML would read that as a number).
4. Troubleshooting
Work from the outside in; each check rules out one layer. Before writing
to anyone, save a diagnostics report: Save diagnostics report in the
tray menu writes one text file with the versions of both halves, the state
of the Maschine and of NI's software, whether Lightroom is connected and
what its plugin said, the profiles and their problems, and the end of both
logs. It lands next to the program's log
(%APPDATA%\maschine2lr\diagnostics-<date>.txt) and opens by itself.
Hardware not found, or found but unusable
The program tells three cases apart, in the tray status and in the log:
Maschine Mk3 not found. Plug it in and switch it on.
The controller isn't on the USB bus at all: cable, power, hub.
The Maschine is plugged in but Native Instruments' software (NIHardwareAgent,
NIHostIntegrationAgent) is holding it. ...
NI's agents have started again (they do, with every sign-in and after NI updates) and the interfaces are not on the WinUSB driver. Answer yes when the program asks, or use Stop Native Instruments software in the tray menu - and install the WinUSB driver (section 1) so it stops mattering.
The Maschine is plugged in but its USB interfaces cannot be opened. ...
The WinUSB swap hasn't taken effect on interface 4 or 5. Redo 1.2.
The plugin is not green in the Plug-in Manager
The Plug-in Manager shows the error. Install Lightroom plugin in the tray menu puts a fresh copy in place; then restart Lightroom. If Lightroom lists two Maschine plugins, remove the one you added by hand.
Lightroom is running but the screens say Waiting for Lightroom
The plugin loads with Lightroom and takes a couple of seconds to be found. If it stays that way, check the Plug-in Manager (above), and that nothing else is talking to the plugin. Only one program can, and a second connection hears nothing.
A control does nothing
Look at maschine2lr.log (Open log in the tray menu). Started from a
console with --verbose (see Appendix A),
the program prints every hardware event, every command sent to Lightroom
and every reply, which tells you which of the three layers to look at:
- no
HW ...line: the hardware event isn't being decoded HW ...but no-> ...: nothing in the active profile binds that control-> ...but no<- ...: Lightroom received it but reported nothing back
Lightroom hangs or stutters while Maschine2LR runs
The end of plugin.log in the runtime folder
shows what the plugin was doing; the diagnostics report includes it.
5. Reverting the drivers
To use the Maschine with NI's own software again:
- Open Device Manager.
- Find the Maschine MK3 entries, right-click each → Uninstall device.
- Unplug and replug the USB cable.
Windows reinstalls the original drivers and NI's software works as before. Redo 1.2 to come back.
6. Where things live
| Path | What |
|---|---|
%APPDATA%\maschine2lr\config.yaml |
ports, paths, device ids, brightness, tuning |
%APPDATA%\maschine2lr\profiles\ |
the mappings, one file per profile |
%APPDATA%\maschine2lr\profiles\icons\ |
your own icons |
%APPDATA%\maschine2lr\profiles\presets.json |
the presets Lightroom reported last |
%APPDATA%\maschine2lr\maschine2lr.log |
the program's log |
| the folder you unpacked | the program, and under profiles\ and lightroom_plugin\ the profiles and plugin as shipped |
%APPDATA%\Adobe\Lightroom\Modules\Maschine.lrplugin\ |
the Lightroom plugin |
%TEMP%\maschine2lr\plugin.log |
what the plugin is doing (the runtime folder) |
%TEMP%\maschine2lr\current_photo.jpg |
the preview the plugin exports for the screens |
The runtime folder is created by the plugin the first time it loads, and the plugin tells the program where it is as soon as they connect, so the two can't drift apart. Deleting it is safe; it's recreated on the next load.
Appendix A. Running from source
The built program is the same code as the repository; this is for working on it.
A.1 Python setup
Requires Python 3.14, the version the shipped program is built with. Install the python.org build, not the
Microsoft Store version. The Store package installs a stub that satisfies
python --version but breaks pip and native extensions.
cd middleware
pip install -r requirements.txt
That brings in pyusb, libusb, libusb-package, Pillow, numpy and
PyYAML for the bridge, fastapi, uvicorn, ruamel.yaml and
python-multipart for the profile editor, and pystray for the tray icon.
numpy is not optional: converting one screen to the display's pixel
format takes a few milliseconds through it against about 93 ms in plain
Python, which is the difference between the screens keeping up and visibly
lagging.
Verify the driver swap from Python:
python -c "import libusb_package; print(libusb_package.find(idVendor=0x17CC, idProduct=0x1600))"
A device description means Windows is letting Python through; None means
the driver swap hasn't taken effect.
A.2 The plugin from a checkout
From a checkout the program does not install the plugin into Lightroom's Modules folder (that would be a second copy of the same plugin). Add it by hand instead:
- File → Plug-in Manager → Add, select
lightroom_plugin\Maschine.lrdevplugin. - The list should show Maschine Controller with a green status.
After changing plugin code: Plug-in Manager → Maschine Controller →
Reload. Check that the reload actually took effect, because a stale
reload looks exactly like a working one: the version number in the
Plug-in Manager should be the new one, and the runtime folder's
plugin.log should end with === plugin v… starting (token ...) ===.
Reloading doesn't stop the previous instance; it keeps running and holding
the network ports. The plugin handles this with a token file
(plugin.instance in the runtime folder), so ordinary reloads are clean
and the older instance logs superseded by a newer instance, retiring. The
one blind spot: two builds that disagree about where the runtime folder is
can't see each other at all. The old one never retires, keeps both ports,
and goes on answering from its older code, while the new one logs a
perfectly clean startup into a different file. The tells: python
tools/smoke_test.py reports plugin sends HELLO failing with no
HELLO while every other check passes; the plugin log has a could not
bind state channel line; or two plugin.log files exist in two places,
both recently written. In any of those cases, quit Lightroom completely
and start it again.
The runtime folder is maschine2lr inside the temp folder Lightroom
reports, which is %TEMP%\maschine2lr on Windows. The plugin decides where
it is and announces it when it connects; paths.photo_thumbnail in
config.yaml is only the program's guess until then. --verbose shows the
folder in use in the RUNTIME: line just after Lightroom connects, and the
plugin log's runtime dir: line says the same from its side.
A.3 Entry points
cd middleware
python launcher.py # the built program: bridge + editor + tray icon
python launcher.py --no-tray # the same in the console; Ctrl+C stops it
python app.py # the bare bridge, everything on the console
python editor.py # the profile editor on its own
app.py is the better tool when something doesn't work, because
everything it does goes to the console:
Searching for Maschine Mk3...
Press Ctrl+C to stop.
Maschine Mk3 connected.
Loaded 11 mapping profile(s): ['default', 'develop_basic', ...]
Lightroom connected
| Flag | Purpose |
|---|---|
--verbose |
log every hardware event, every command sent, every reply |
--seconds N |
exit after N seconds |
--diagnostics |
print a diagnostics report and exit (launcher.py) |
--ni stop\|leave\|ask |
what to do about NI's software at start (launcher.py) |
--no-browser |
don't open the editor in a browser (launcher.py, editor.py) |
--port N |
the editor's port (launcher.py, editor.py) |
From source, profiles are read from middleware/profiles/ and the config
from middleware/config.yaml. Add missing shipped profiles does nothing
there, since the two folders are the same.
A.4 Probing plugin and hardware
cd middleware
python tools/smoke_test.py # the plugin side, check by check
python tools/smoke_test.py --write # also nudges Exposure and puts it back
python tools/smoke_test.py --params # does every watched parameter report a value?
python tools/smoke_test.py --hardware # also exercises the Maschine
python tools/smoke_test.py --masks # which mask types Lightroom accepts
python tools/hardware_explorer.py # a live dashboard of every control, no Lightroom
python tools/showcase.py # every LED bright and animated, content on the screens: for photos and videos
--help lists the other probes (--tools, --presets, --profiles,
--upright, --crop, --mask-list, --preset-info NAME).
Only one program can talk to the plugin at a time. Stop the bridge before running the smoke test. A second connection is accepted but then hears nothing, which looks like the plugin being broken rather than busy. The smoke test detects that case and says so.
A.5 Where things live in the repository
| Path | What |
|---|---|
project.json |
the version, website, contact and links in one place; middleware/tools/stamp_project.py stamps them into the plugin and system/about.py |
lightroom_plugin/Maschine.lrdevplugin/ |
the Lightroom plugin |
middleware/launcher.py, app.py, editor.py |
the entry points |
middleware/profiles/*.yaml |
the mappings that ship |
middleware/config.yaml |
the configuration that ships |
middleware/mapping/ |
profiles, actions, the engine |
middleware/hardware/ |
the USB protocol, controls, LEDs, screens |
middleware/editor/ |
the profile editor (server, previews, web UI) |
middleware/system/ |
NI software, USB diagnosis, plugin installation, updates, file locations |
middleware/packaging/ |
build.ps1 builds the program folder, publish.ps1 zips it and makes the GitHub release |
middleware/tools/ |
diagnostics and hardware exploration |
docs/protocol.md |
plugin ↔ middleware wire protocol |
docs/testing.md |
how to run the test suites |
docs/hardware_protocol.md |
the reverse-engineered USB protocol |
website/ |
the website, including this manual's build |
This page is generated from the manual in the repository on every publish, and its pictures are rendered by the software itself. Last built 2026-09-14.